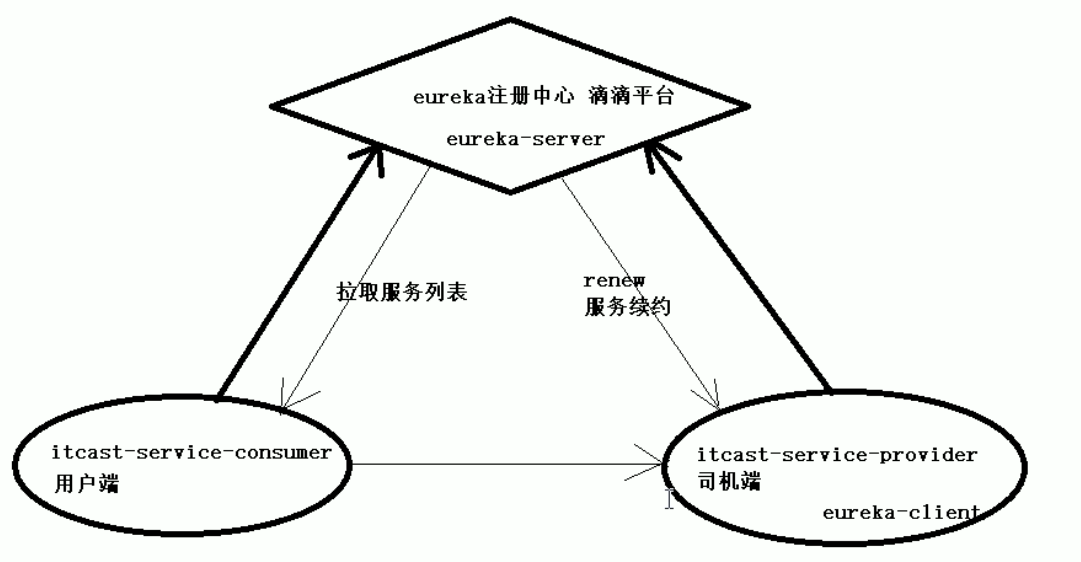
上图为eureka架构,以滴滴打车平台为例
eureka注册中心——滴滴平台
编写pom.xml
引入启动器
-
1
2
3
4
  <properties>
      <java.version>1.8</java.version>
      <spring-cloud.version>Greenwich.SR2</spring-cloud.version>
  </properties>
- 统一管理依赖的版本号
1
2
3
4
5
6
7
8
9
10
11
  <dependencyManagement>
      <dependencies>
          <dependency>
              <groupId>org.springframework.cloud</groupId>
              <artifactId>spring-cloud-dependencies</artifactId>
              <version>${spring-cloud.version}</version>
              <type>pom</type>
              <scope>import</scope>
          </dependency>
      </dependencies>
  </dependencyManagement>
编写
application.xml1 2 3 4 5 6 7 8 9
server: port: 10086 spring: application: name: itcast-eureka # 将来作为微服务名称注入到eureka容器 eureka: client: service-url: defaultZone: http://localhost:${server.port}/eureka
引导类@EnableEurekaServer
1
2
3
4
5
6
7
8
@SpringBootApplication
@EnableEurekaServer //启用eureka服务端组件
public class ItcastEurekaApplication {
	public static void main(String[] args) {
		SpringApplication.run(ItcastEurekaApplication.class, args);
	}

}
客户端——用户端(服务消费者)
编写pom.xml
- 和上述注册中心一样,但还要添加 ( 类比安装滴滴APP )
1
2
3
4
5
  <!--注册到eureka容器-->
  <dependency>
      <groupId>org.springframework.cloud</groupId>
      <artifactId>spring-cloud-starter-netflix-eureka-server</artifactId>
  </dependency>
编写
application.yml1 2 3 4 5 6 7 8 9 10 11 12 13 14 15 16
server: port: 8081 spring: datasource: url: jdbc:mysql://127.0.0.1:3306/mybatis? //注意次数,不添加乱码serverTimezone=UTC username: root password: root driver-class-name: com.mysql.cj.jdbc.Driver application: name: service-provider # 将来会作为微服务的名称 mybatis: type-aliases-package: com.itcast.service.pojo eureka: client: service-url: defaultZone: http://localhost:10086/eureka
启动类 @EnableDiscoveryClient
1
2
3
4
5
6
7
8
9
10
11
12
13
14
15
16
17
package com.itcast.service;

import org.springframework.boot.SpringApplication;
import org.springframework.boot.autoconfigure.SpringBootApplication;
import org.springframework.cloud.client.discovery.EnableDiscoveryClient;
import tk.mybatis.spring.annotation.MapperScan;

@MapperScan( basePackages = "com.itcast.service.mapper")
@SpringBootApplication
@EnableDiscoveryClient
public class ItcastServiceProviderApplication {

    public static void main(String[] args) {
        SpringApplication.run(ItcastServiceProviderApplication.class, args);
    }

}
客户端——司机端(服务提供者)
pom.xml application.xml 启动类 和上述消费者相同
controller 类
1
2
3
4
5
6
7
8
9
10
11
12
13
14
15
16
17
18
19
20
21
22
23
24
25
26
27
28
29
30
31
32
package com.itcast.service.controller;

import com.itcast.service.pojo.User;
import org.springframework.cloud.client.ServiceInstance;
import org.springframework.cloud.client.discovery.DiscoveryClient; //一定不要导错包
import org.springframework.beans.factory.annotation.Autowired;
import org.springframework.stereotype.Controller;
import org.springframework.web.bind.annotation.*;
import org.springframework.web.client.RestTemplate;

import java.util.List;

@Controller
@RequestMapping("consumer/user")
public class UserController {

    @Autowired
    private RestTemplate restTemplate;

    @Autowired
    private  DiscoveryClient discoveryClient;// 包含了拉取的所有服务信息

    @GetMapping
    @ResponseBody
    public User queryUserById(@RequestParam("id")int id){
        //得到服务实例
        List<ServiceInstance> instances = discoveryClient.getInstances("service-provider");
        ServiceInstance instanceInfo = instances.get(0);

        return this.restTemplate.getForObject("http://" + instanceInfo.getHost() + ":" + instanceInfo.getPort() + "/user/" + id, User.class);
    }
}
上述代码为得到服务的主机和端口并使用,最开始我使用DiscoveryClient一直显示没有这个Bean,后来才发现是包导错了。
netfix有一个类和这个类相同,我们需要的是import org.springframework.cloud.client.discovery.DiscoveryClient; 切记!