一下午的时光,只为写出一个@Autowired 😭
课程来自乐优商城2018-11期,springcloud的第一个demo
需求:用通用mapper实现数据库的查询(以下代码省略的package和import部分)
-
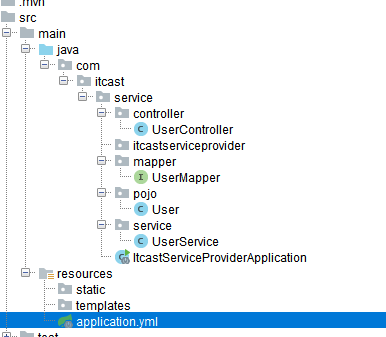
目录结构(入口文件一定要和controller同级,不然mapper扫描不到)

- application.yml
1
2
3
4
5
6
7
8
9
10
server:
port: 8081
spring:
datasource:
  url: jdbc:mysql://127.0.0.1:3306/mybatis
  username: root
  password: root
  driver-class-name: com.mysql.jdbc.Driver
mybatis:
type-aliases-package: com.itcast.service.pojo
- ItcastServiceProviderApplication.class
1
2
3
4
5
6
7
8
9
@MapperScan( basePackages = "com.itcast.service.mapper")  //此处扫描mapper,一定要填对位置。mapper类就不用加了
@SpringBootApplication
public class ItcastServiceProviderApplication {

	public static void main(String[] args) {
		SpringApplication.run(ItcastServiceProviderApplication.class, args);
	}

}
- pojo User.class
1
2
3
4
5
6
7
8
9
10
11
12
13
14
15
16
17
18
@Data   //lombok 可省略getter,setter方法
@Table(name = "tb_user")    //数据库表名
public class User implements Serializable {
    @Id
    @KeySql(useGeneratedKeys = true)    //id 主键
    private Long id;

    private String username;

    private String phone;

    private String password;

    private String salt;

    private String created;

}
- mapper UserMapper
1
2
3
4
5
6
package com.itcast.service.mapper;
import com.itcast.service.pojo.User;
import tk.mybatis.mapper.common.Mapper;

public interface UserMapper extends Mapper<User>{ //继承Mapper(这是需要被扫描到的mapper)泛型为pojo User类
}
- service UserService
1
2
3
4
5
6
7
8
9
10
@Service
public class UserService {

    @Autowired
    public UserMapper userMapper;   此处可能会报没有这个Bean的错,不要理它

    public User queryUserById(int id){
        return this.userMapper.selectByPrimaryKey(id);
    }
}
- controller UserController
1
2
3
4
5
6
7
8
9
10
11
12
@RestController
@RequestMapping("/user")
public class UserController {

    @Autowired
    public UserService userService;

    @GetMapping("{id}")
    public User queryUserById(@PathVariable("id")int id){
        return this.userService.queryUserById(id);
    }
}
- 注意上述的@Autowired,老师没有加。我最开始是没有加的,但是打印出来userService始终为null。说明始终未注入,所以,加入此注解。成功!
总结
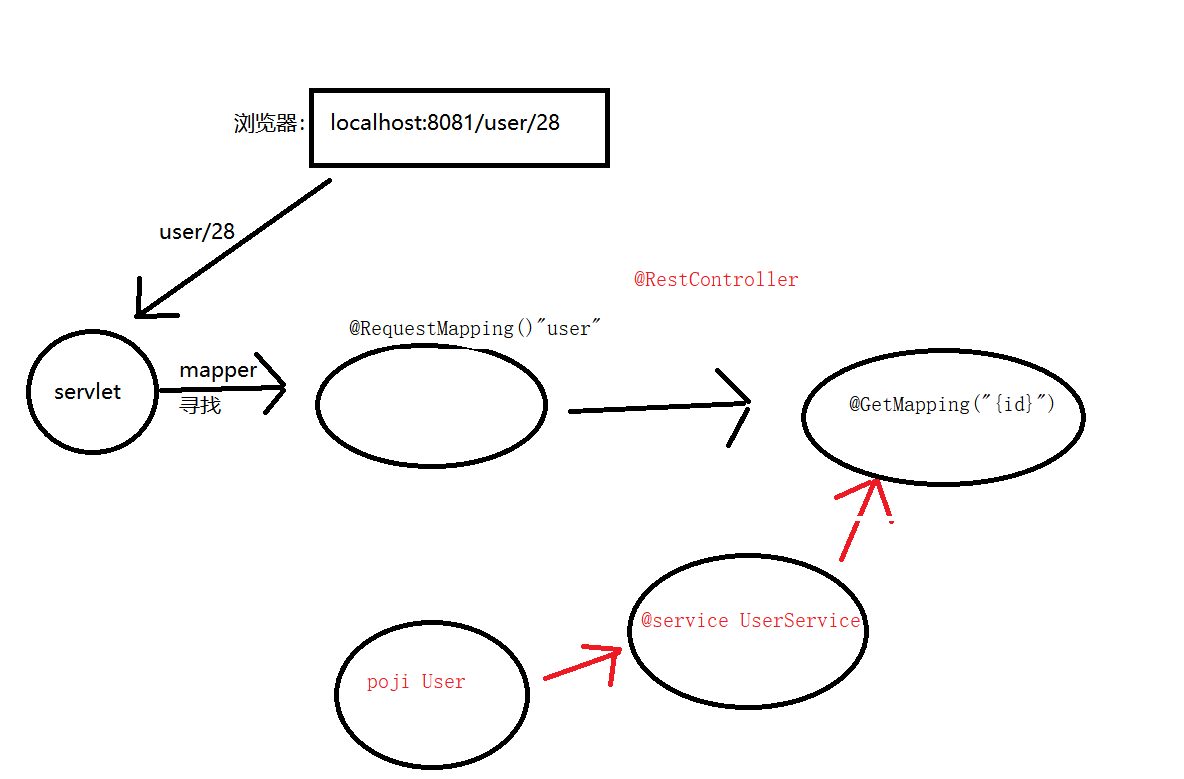
通过上述一个简单的demo,自己对springboot的运行周期有了一个比较清楚的了解,如下图
 可能会有些错误,但自己水平目前只能理解到这里了。
好记性不如烂笔头,之前看了好几遍视频,总觉得很easy,可当真上手了就各种问题出现。
一定要多动手啊!!!!!!!